


In the first two posts in this series, we talked about why now is an excellent time for developers to start building on Bitcoin and how Bitcoin works. Now we're going to start applying some of that knowledge and get started programming.
We're going to start by looking at the fundamentals of Bitcoin scripting and how Bitcoin transactions are constructed. Along the way, you'll learn important fundamentals about how Bitcoin works, but you'll also begin to see the major drawbacks of trying to build with only Bitcoin.
In coming tutorials, we'll begin looking at how to use Stacks, a Bitcoin L2, to build a full-stack dapp using Bitcoin, the same way you might build a full-stack dapp on something like Ethereum.
The web application UI itself will be hosted on a traditional centralized hosting service, but every other piece will use decentralized technology like Bitcoin, Stacks, sBTC, and Clarity.
We're going to start off in this tutorial by utilizing the command line to get Bitcoin set up on our local machine and begin working with it, then in upcoming tutorials, we'll gradually add on a UI and look at how to use a web wallet extension to interact with our Bitcoin dapp.
The first thing we need to do is get Bitcoin set up on our machine. Start by downloading Bitcoin Core.

Once it's installed you'll want to run bitcoind, which is the CLI we use to actually run Bitcoin.
Note that you don't need to run and download a full node in order to follow along here. We can run Bitcoin is regtest mode in order to create our own localized private Bitcoin network.
You can do that by running bitcoind -regtest -daemon which will run a regtest version of Bitcoin in the background as a daemon.
The next thing you need to familiarize yourself with is the Bitcoin CLI.
The first thing we are going to do is generate some new blocks and send the block reward to a new address that we'll generate.
We can do that with bitcoin-cli -regtest generatetoaddress 101 $(bitcoin-cli -regtest getnewaddress)
Here were telling the CLI to enter regtest mode, then generate 101 new blocks and send the block reward to the provided address, which in this case is a script to generate a new address using the CLI.
An array of the generated block hashes will be returned to us.

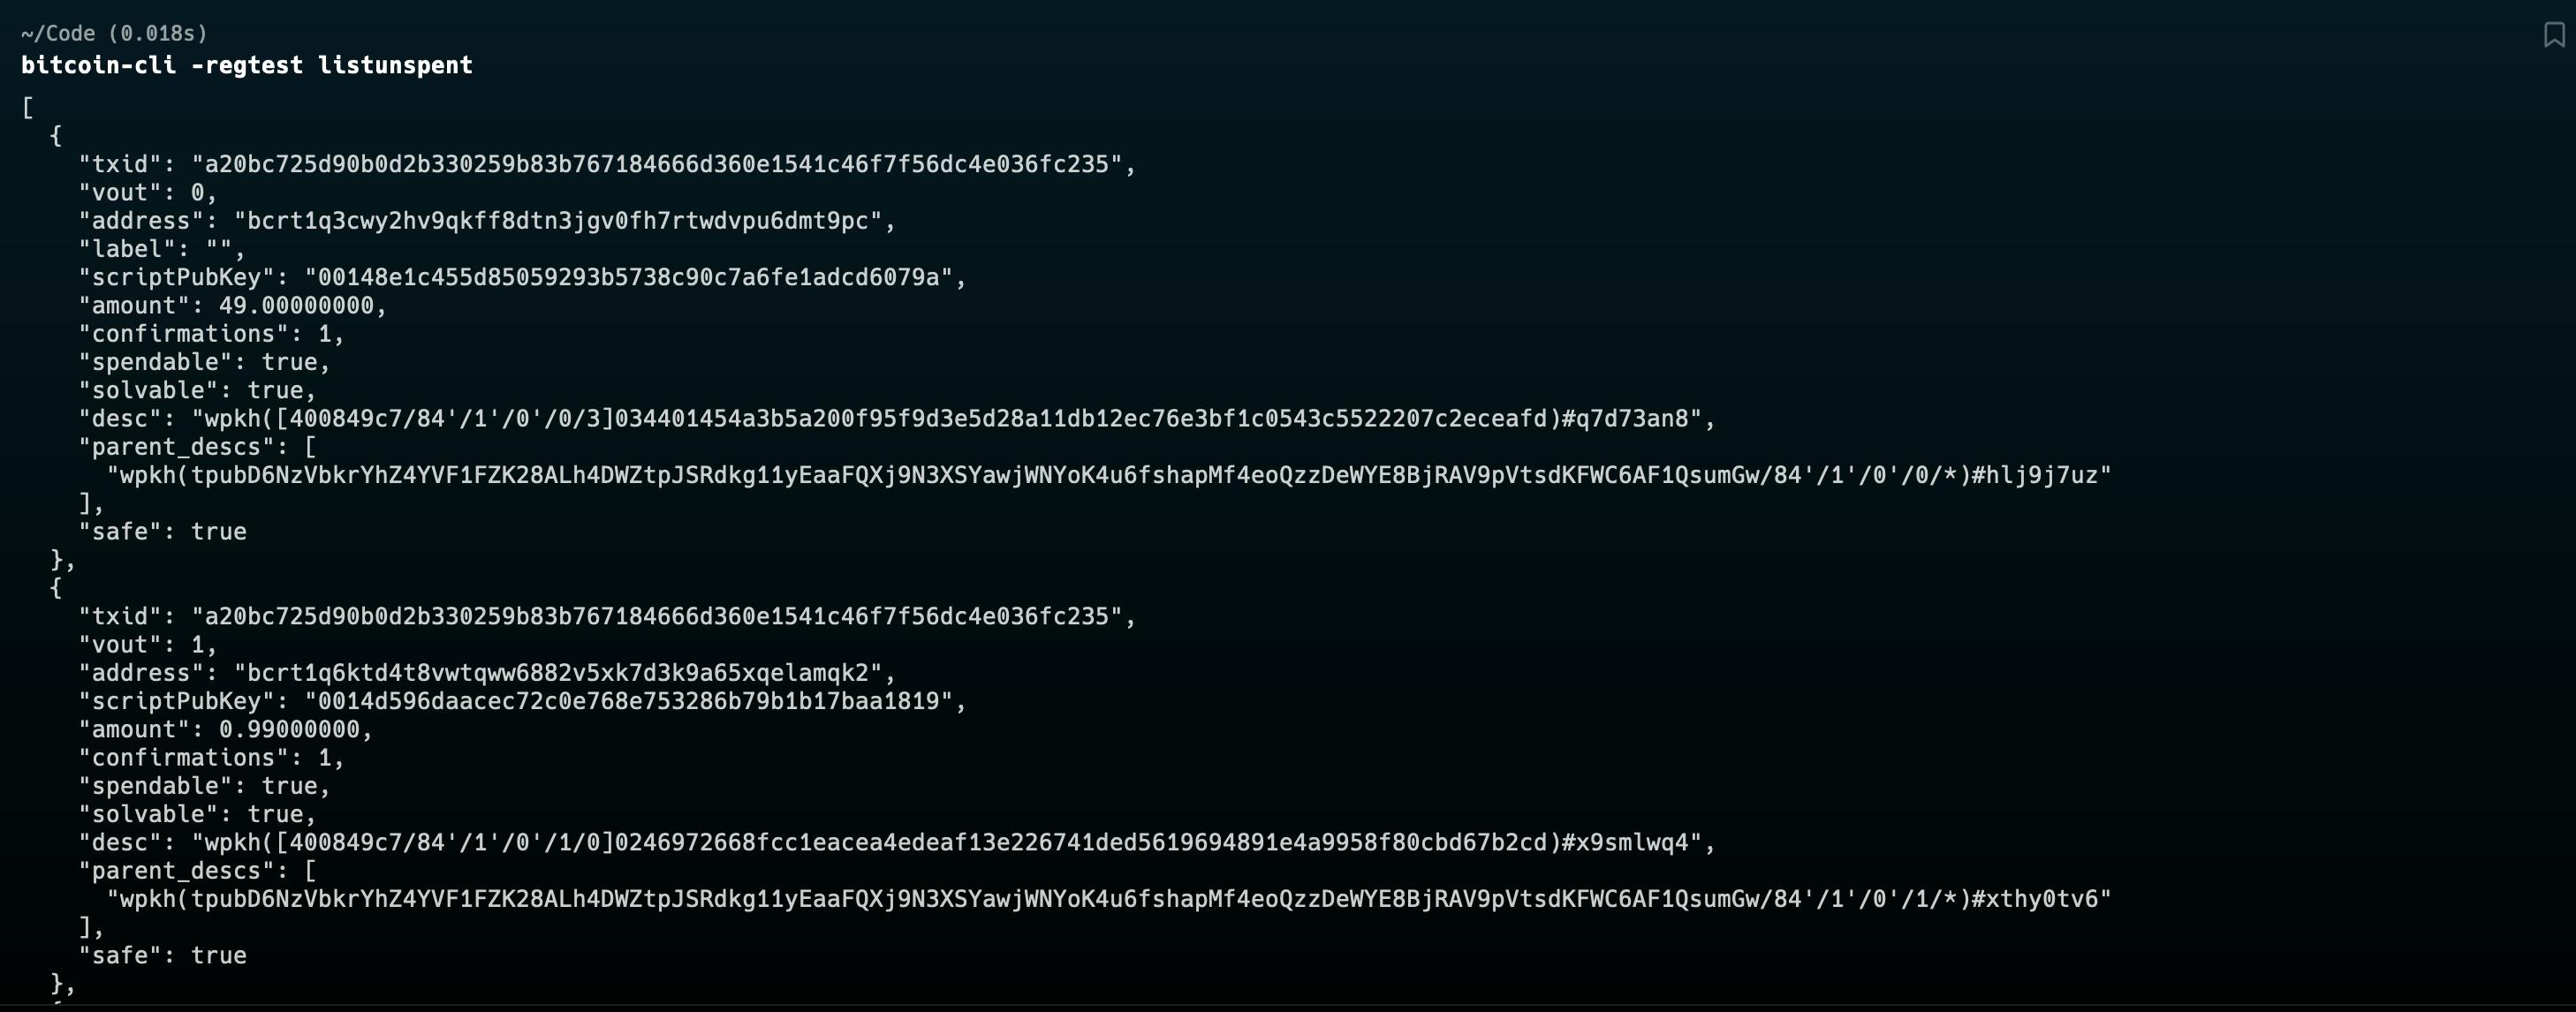
Now we can see the list of UTXOs we have created:
bitcoin-cli -regtest listunspent
And get the balance of our newly generated address:
bitcoin-cli -regtest getbalance
Alright we now have Bitcoin running locally and have a basic understanding of how to interact with it. Let's pause and take a look at how Bitcoin Script works before coming back and using the CLI to create some transactions.
Bitcoin Script Fundamentals
In the last tutorial, we briefly covered Bitcoin's scripting language, Script. Now let's dive a little deeper into that and look at how we can actually use Script to write Bitcoin applications that do useful things.
We're going to start with a very simple Hellow World script to learn the basics, then we'll look at how we can create some more complex scripts down below as we create the MVP of our app.
We'll be using an online Bitcoin IDE in order to write and visualize our script.
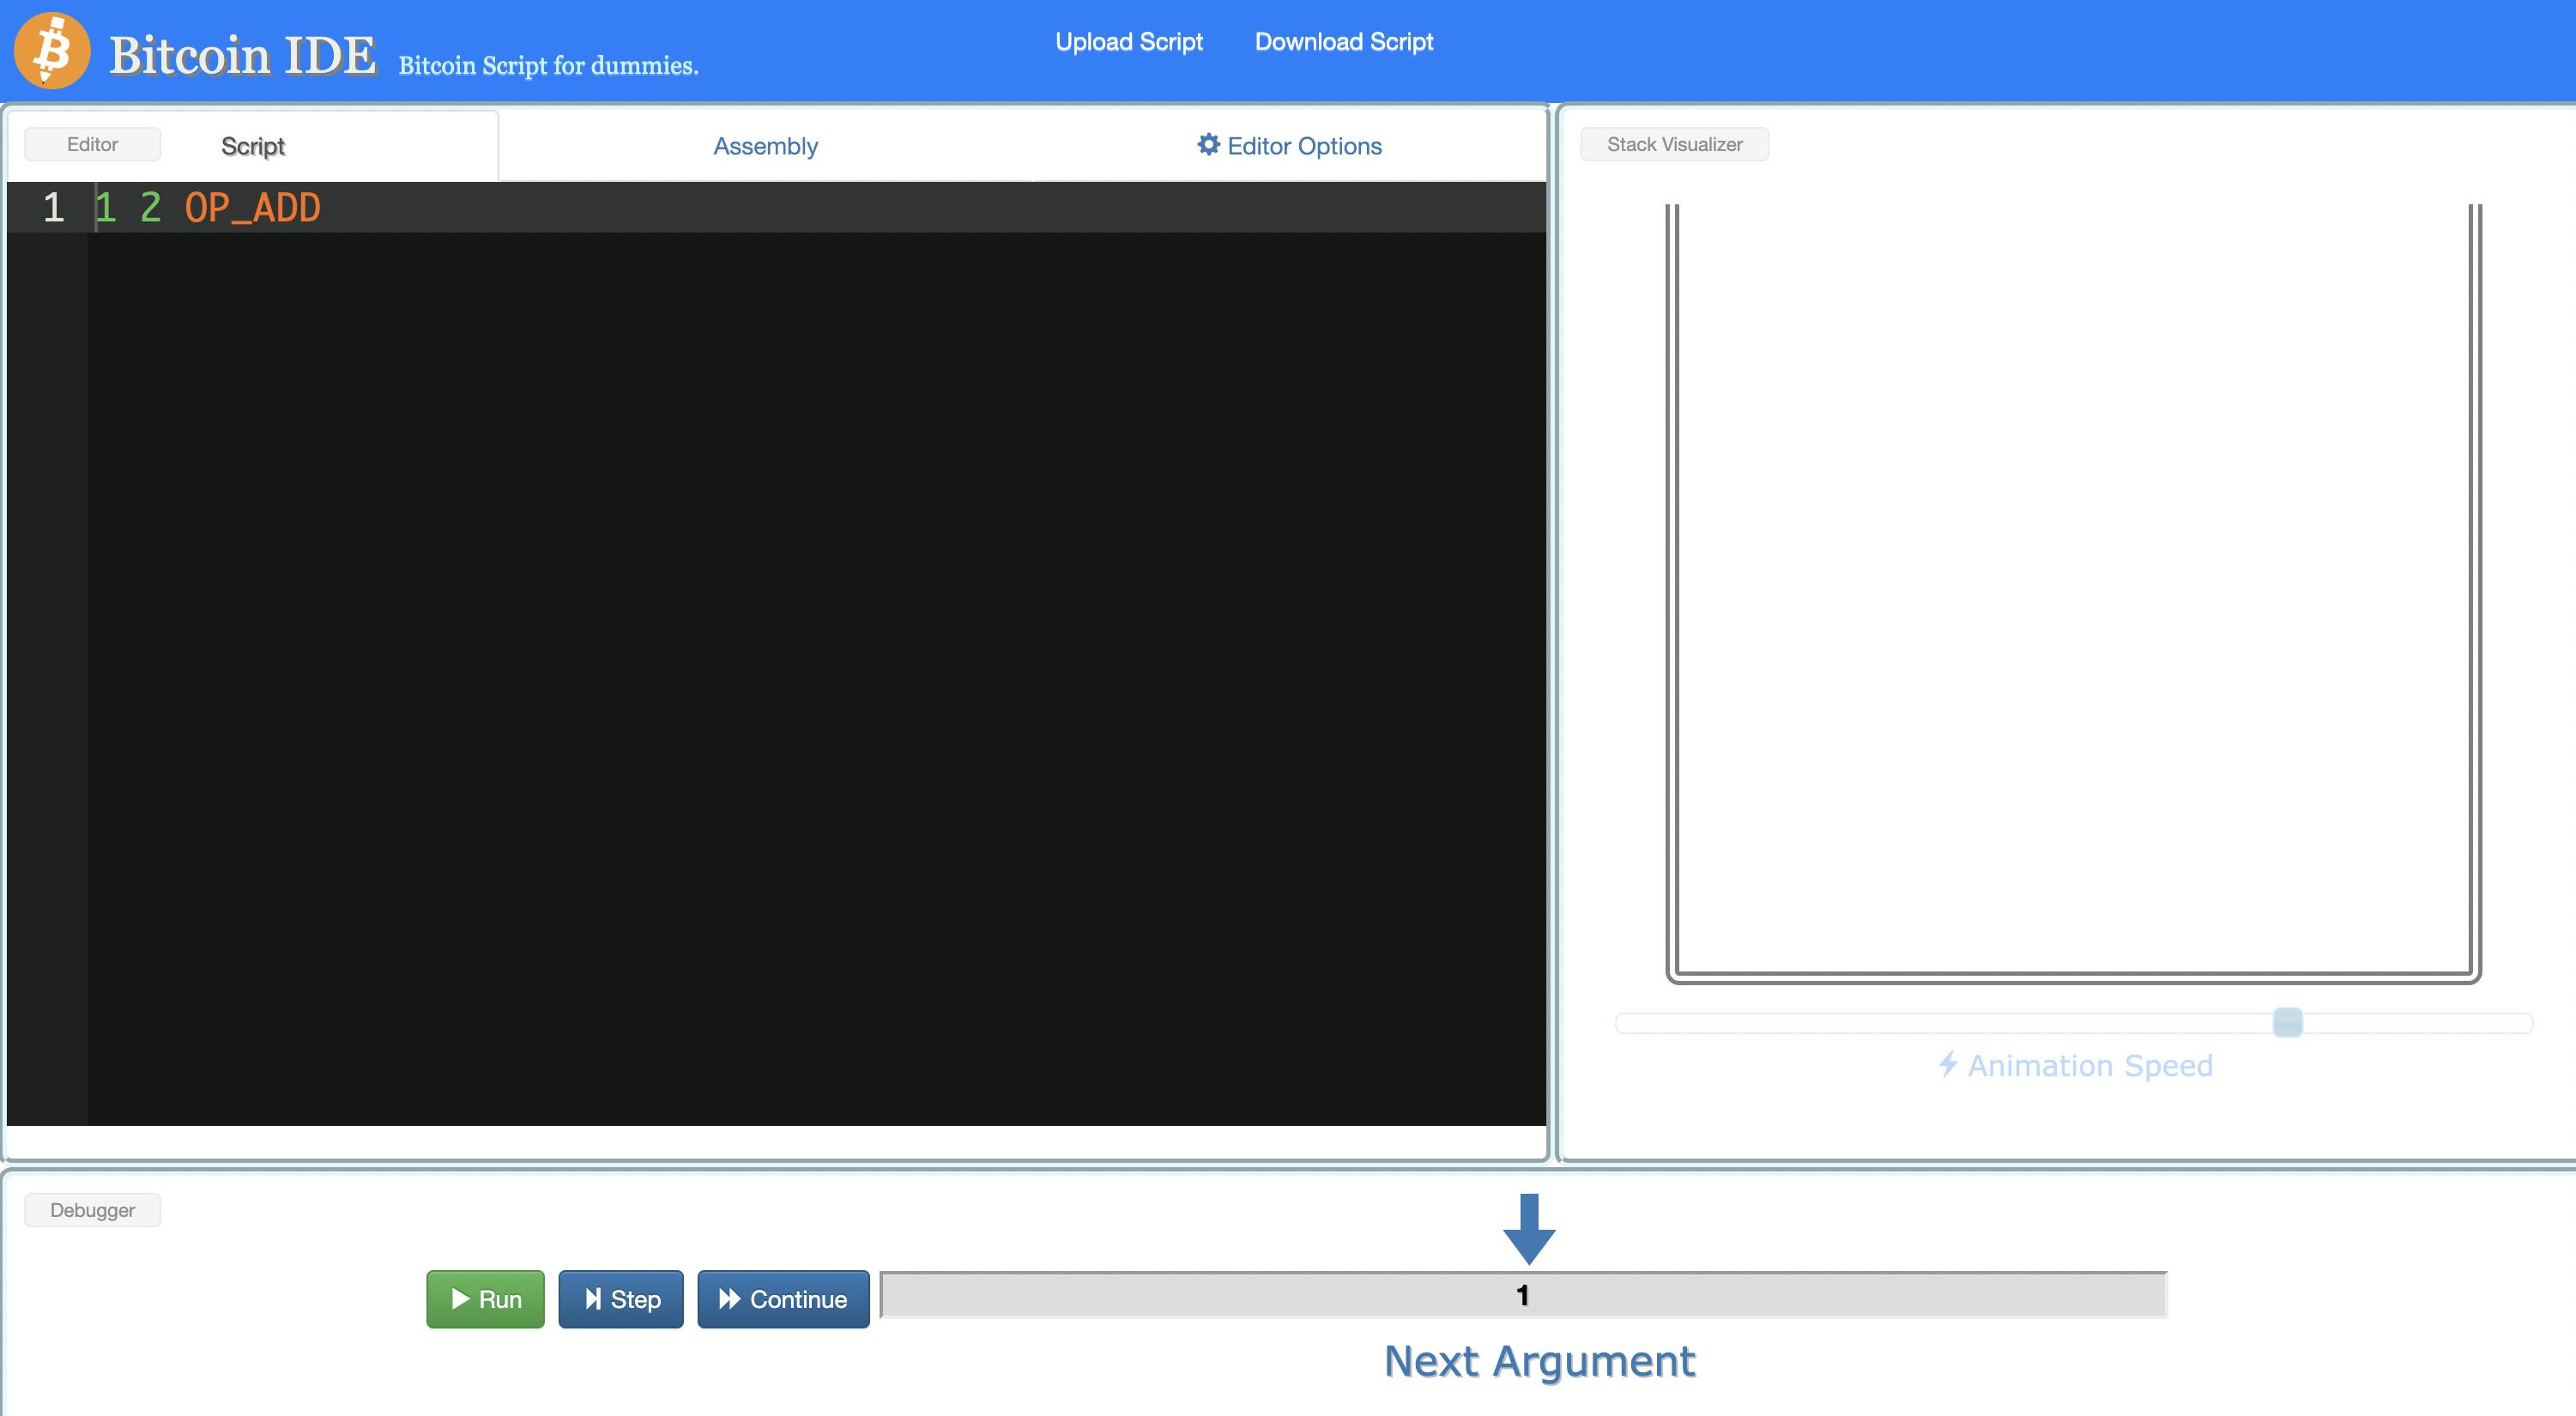
This visualization is extremely helpful for understanding how Bitcoin Script actually works. We have some code here by default: 1 2 OP_ADD.
Take a second to try and guess what this code will do. Then use the 'Step' button to go through the operations step by step and see what happens.
What we've done here is added each number to the stack, and then applied the OP_ADD function to them. OP_ADD takes two inputs and adds them together. You can see all the available OPCODES and what they do in the OPCODE reference.
Now let's try adding another number here, running through the step function and seeing what happens. It might not be what you expect.
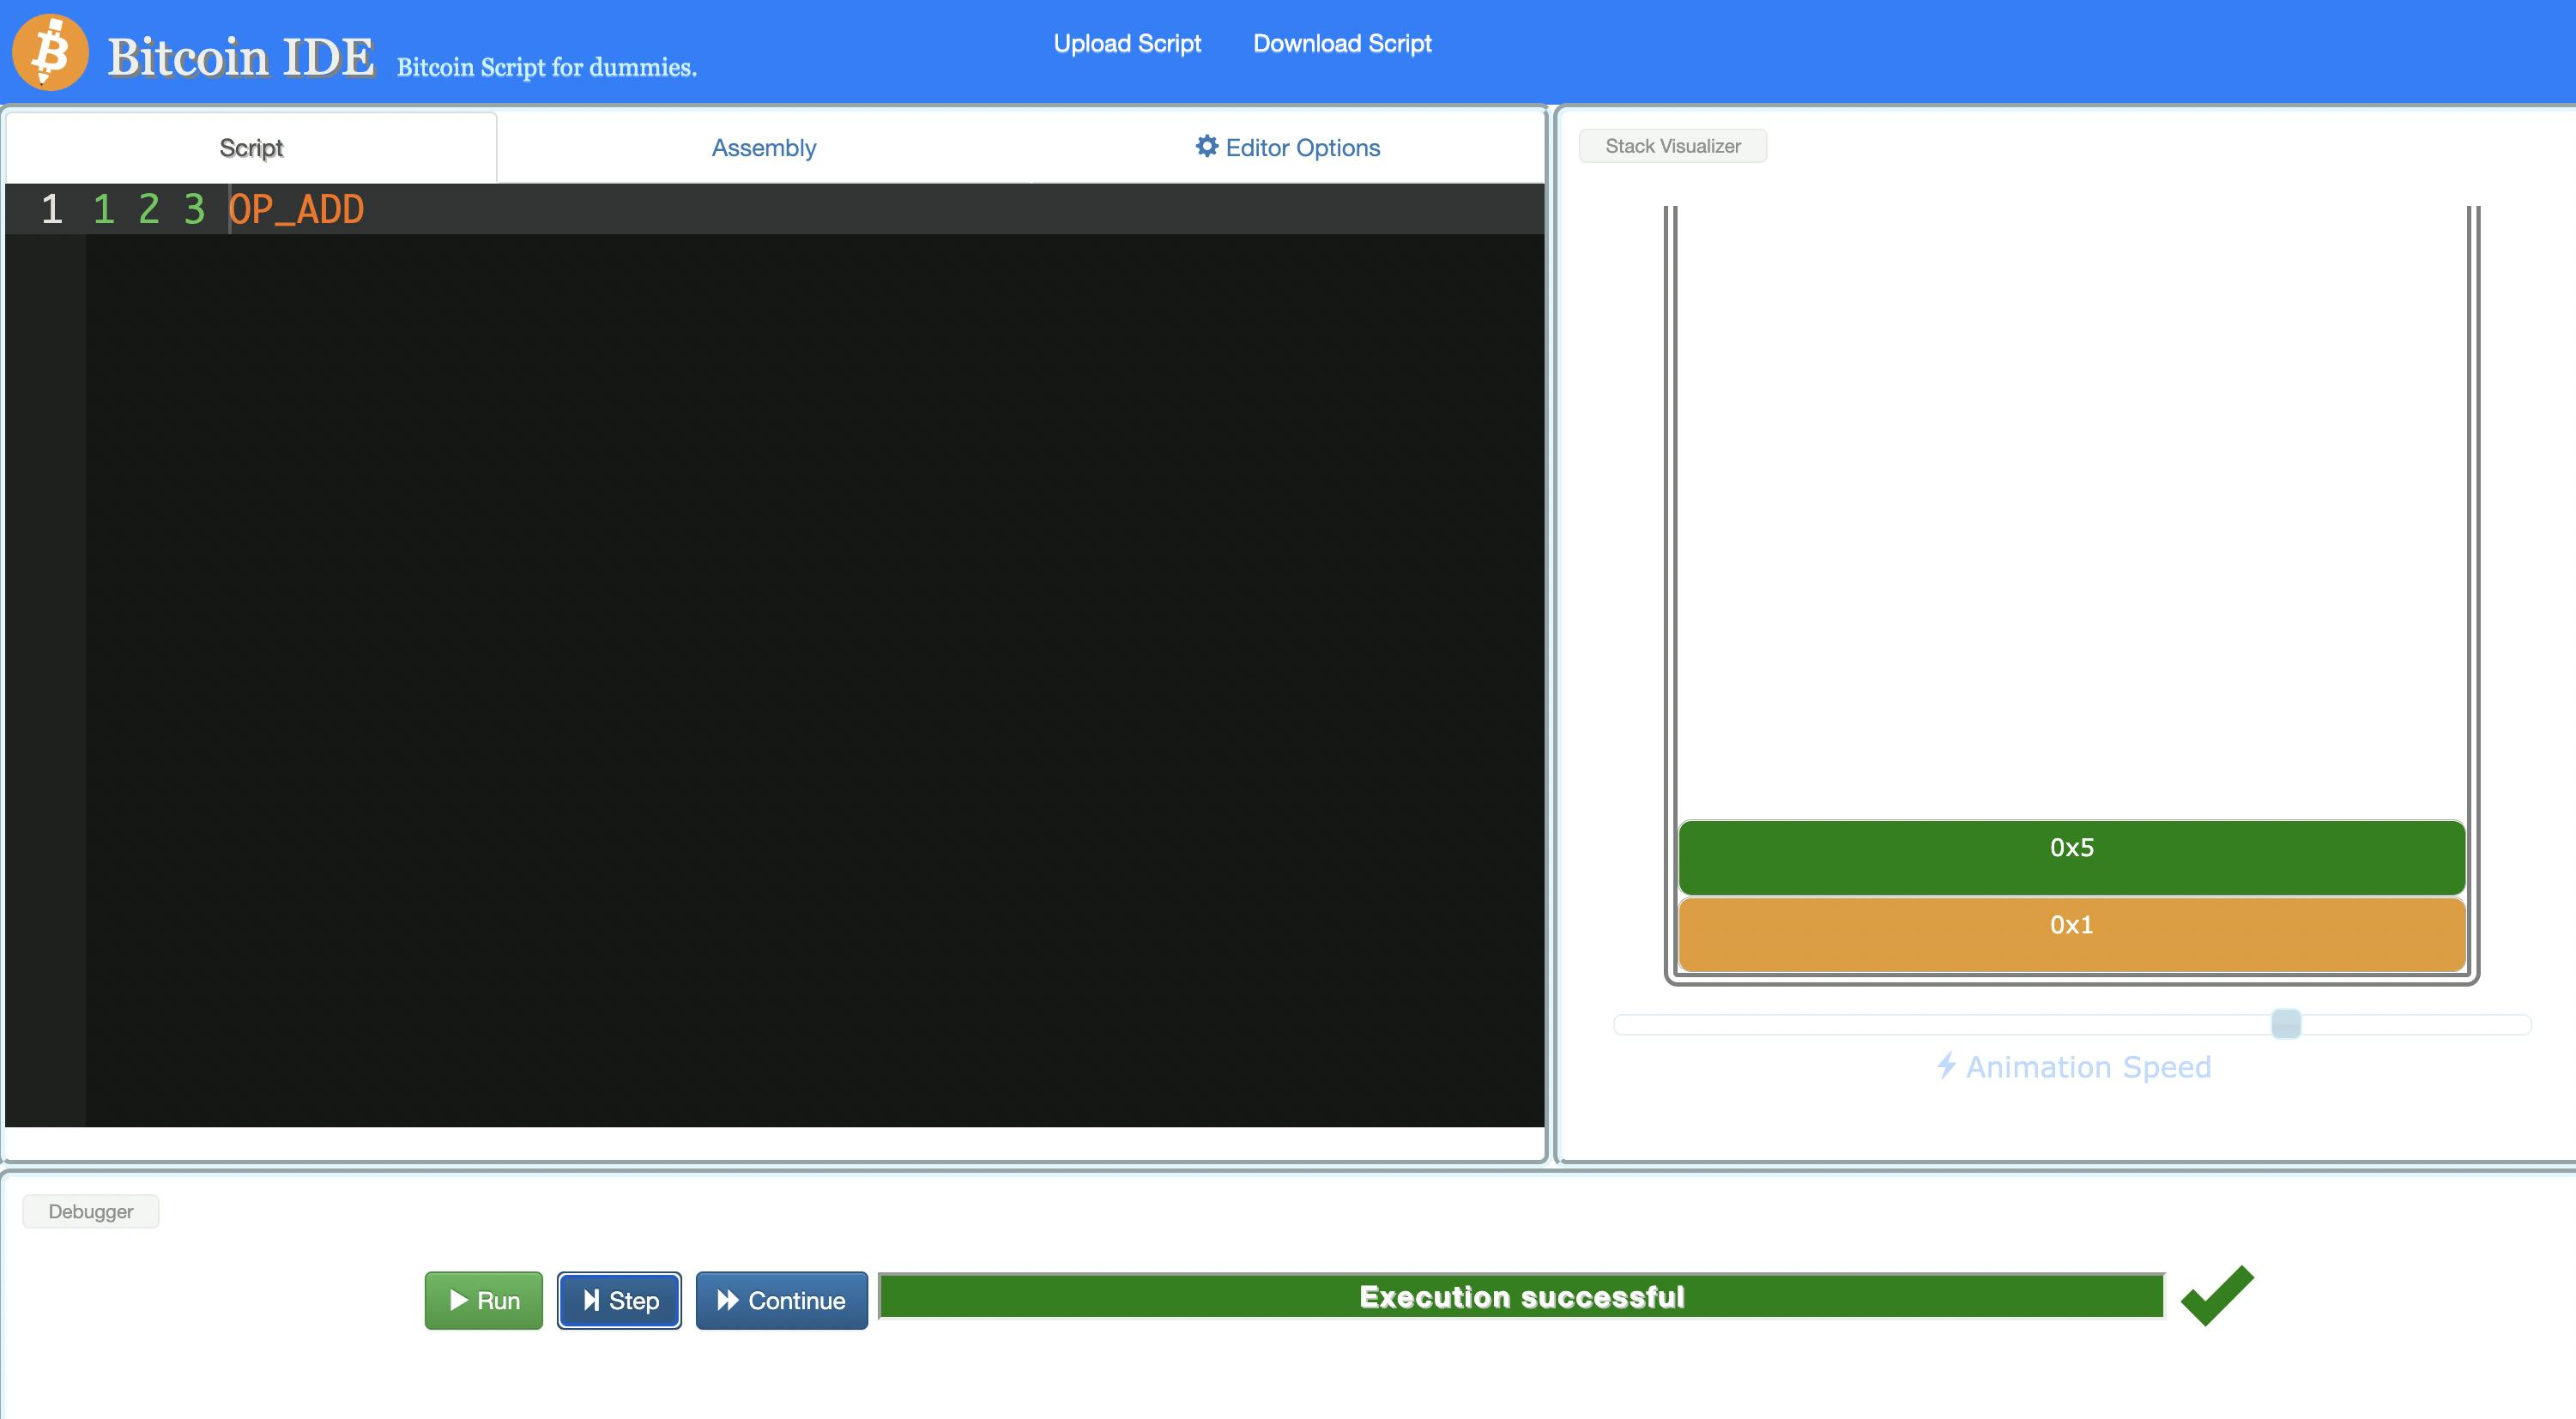
Why did we not get a single 0x6 back instead of this 0x5? Because remember that we go data by data and apply these OPCODE functions. The OP_ADD function takes the top two pieces of data, adds them, and then pushes the result back on to the stack.
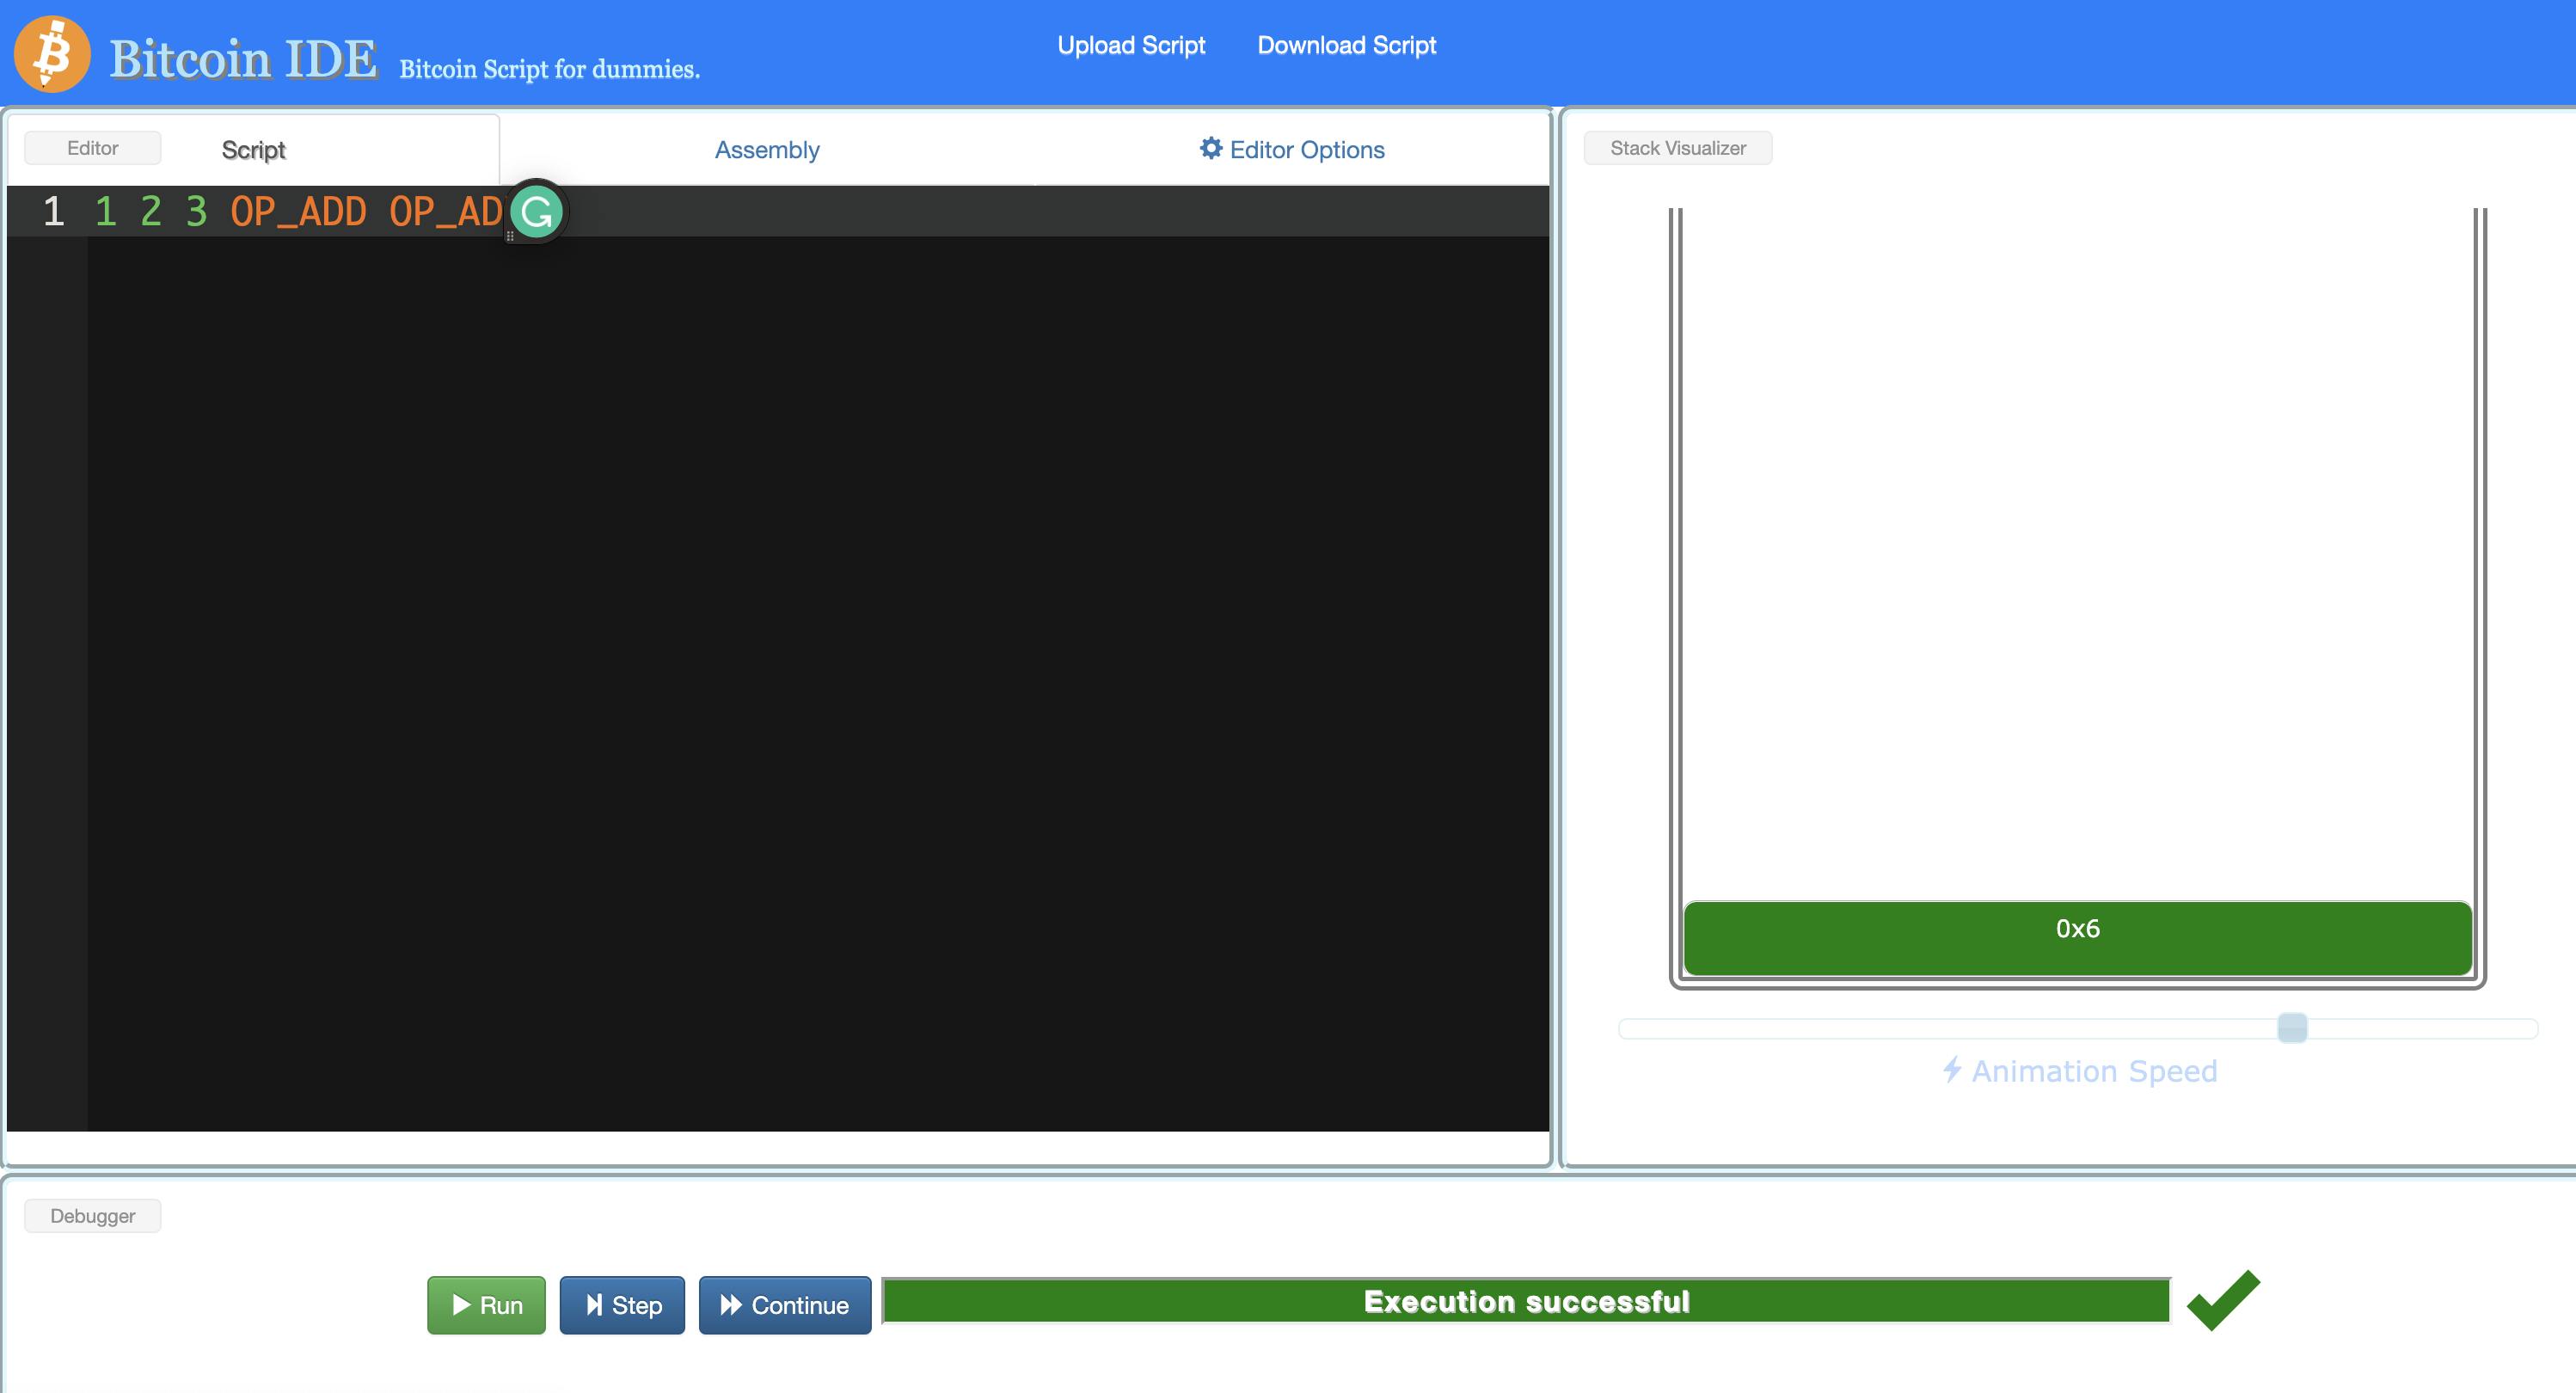
So here we are adding 2 and 3 last, so OP_ADD will then take those, add them, and push them. If we want to add all of these numbers together we could add another OP_ADD function and see what that does.
Now I want you to try and write a script that does the following:
Adds together two integers.
Checks to see if the value of those integers is greater than 7.
If it is, the execution will be successful, otherwise it won't be. Recall that a script is considered successful and valid if it returns 1 or greater. Look at the OPCODES and figure out what that means for this particular challenge.
You'll need to explore the OPCODE reference in order to complete this task.
Try to do this on your own before looking at the solution below 👇🏻
No cheating.
🔽
🔽
🔽
🔽
🔽
🔽
🔽
🔽
🔽
🔽
Ready for the solution?
7 2 2 op_add op_greaterthan
Add this to the IDE and step through each step to figure out why this is the solution if you got something different.
How does scripting work in the context of transactions? Remember that fundamentally, Bitcoin is built on UTXOs. The UTXO set consists of all of the unspent transaction outputs and represents the current state of the network as far as who can spend what bitcoins.
Scripting is how we actually create and enforce these spending conditions.
So if I have 1 bitcoin, that might mean that I have two UTXOs, each representing half a bitcoin. Scripting is what makes it impossible for anybody but me, with my private key, to spend that UTXO.
How does this work?
Each UTXO comes with a locking script that is a sort of cryptographic puzzle that needs to be solved before it can be used as a valid input to another transaction.
So if I want to use one of my UTXOs, I need to solve that puzzle. When I go to create a new transaction, I provide an unlocking script along with the UTXO that I want to use as input.
This unlocking script serves as the solution to the puzzle provided by the locking script.
Usually, these puzzles will utilize our public and private keys to verify that we are in fact the owners of these UTXOs, so that the only way to unlock the UTXO is to provide the correct combination of public and private key.
Depending on the block explorer, we can see the output scripts included in transactions. For example, take a look at this transaction, scroll down and you can see the scripts that were included with these outputs:

This is the locking script or the script that the receiver of this output must be able to unlock in order to use this output.
So when we go to use this output by providing it as an input to another transaction, we then give an unlocking script in order to unlock it and actually be able to do that.
If we click this little arrow next to the input, we can go to the previous transaction containing the output used for this input.
Then we can see the locking script that was provided for this new input. The unlocking script provides the signature of the private key and the public key that are required to fulfill the requirements of the locking script.
Upon creating a new transaction, these two values are combined with the locking script via the stack and the result needs to be valid for this transaction to be considered valid.
Walkthrough a P2PKH Script
In the above transaction example, you can see that the first output has a P2PKH script.
P2PKH stands for pay to public key hash, and it is the most common type of script in Bitcoin. This is the script that gets run when you make a basic transaction from one address to another.
That script consists of the following code:
OP_DUP OP_HASH160 f1304d590d8f1a6b8cefd655c584616f8f68ea81 OP_EQUALVERIFY OP_CHECKSIG
Let's walk through exactly what this script is doing when we initiate a transaction.
When we use our wallet to initiate a transaction, remember that what we are actually doing is creating a new input by utilizing one of our existing outputs, or UTXOs more specifically, as that new input. When we do that, we provide the transaction ID of the output we want to use.
The wallet will then go find the output that matches that transaction ID, look at the locking script, the scriptPubKey field, and see if the unlocking script we are providing with our new input satisfies the conditions required.
We do this by combining these two scripts together. In the Input Scripts section of the screenshot, we can see the P2PKH script consists of two large hexadecimal numbers.
These represent hashes of the signature of the sender's public key and their public key, respectively.
We will place the unlocking script in front of the locking script and run the code. If it evaluates to true then we are allowed to spend this as a valid input to a new transaction.
So using the transaction above, the whole thing would look like this:
47304402203939a0a60876c330fd5165f4648cd431d8b379a6ac1a9022e31afa10ef30d827022035e07560ca6068669ce17d7acaac193 54a148ac453d2feb518b236aa8fc1cc2a012102dc109689e8655dc90d09544397d8b04989cd42b8037d15ba629b12d5ab77c068 OP_DUP OP_HASH160 f1304d590d8f1a6b8cefd655c584616f8f68ea81 OP_EQUALVERIFY OP_CHECKSIG
Okay there's a lot here, I want you to try and go through this step by step and figure out what exactly it is doing by using what we've already learned about stack-based languages and Bitcoin OPCODES.
I'm not going to give you the answer, you can refer to Learn Me a Bitcoin if you get stuck. But writing down how this script works step-by-step will be an excellent exercise to help you understand how scripting in Bitcoin works.
Then, go through all of the standard scripts on Learn Me a Bitcoin and familiarize yourself with how they work.
Planning Your First Bitcoin App
Let's outline some of the functionality we want our app to have.
To me, one of the most broken systems in America that a Bitcoin economy has the potential to fix is healthcare.
The healthcare and health insurance industries are hopelessly broken, with a vast amount of wasteful spending, inefficiencies, and fraud, much of which could be solved by migrating to a better system.
CrowdHealth is a startup that is seeking to change this by creating a system of crowdfunded healthcare. They currently work with Swan Bitcoin to allow members to pay in Bitcoin to be a member of their network.
While companies that offer services like this are excellent, they suffer from one critical flaw that goes against the ethos of Bitcoin: they are centralized.
In the past, it has been necessary to work with centralized companies in order to use your Bitcoin and make it productive. With the rise of Bitcoin layers, this is no longer the case.
What if we took the services that Swan and CrowdHealth provide and created a completely decentralized version that did not require using a centralized, trusted third party?
That's what we'll be exploring in the rest of this tutorial.
For an overview of how CrowdHealth works and how they utilize Bitcoin, check out their website.
The simplified version we'll create will have the following functionality. Note that this is slightly different from how CrowdHealth works, we're simplifying things a bit for the purpose of learning. We'll call our app BitHealth.
First, members will be able to join for a flat rate of 0.005 BTC (500,000 SATS, ~$100) per month. This gets them access to the BitHealth network.
Any time someone has a health incident, they are expected to pay the first 0.02 BTC (roughly $400) toward the cost of that incident. After that, they submit a request to the community to have the rest covered. For more about how this process works, again, check out CrowdHealth's website.
Community members then voluntarily give from their personal BitHealth wallet to cover expenses for this member. Members are given generosity scores and when members submit new requests, members with higher generosity scores are given priority in requests being sent out.
So how can we create a decentralized version of all this and eliminate any centralized control over this process?
Here's a basic outline of a user flow and the tech stack we'll be using to handle each piece.
Don't worry if this doesn't make a ton of sense yet, we'll be digging into and explaining each piece of this as we go through the series.
Let's say we are a new user signing up for BitHealth.
The first step would be to sign up for an account using a web wallet that supports Bitcoin like the Hiro Wallet.
Then, the user sets up a new Bitcoin wallet dedicated to their BitHealth funds and adds the address of that wallet to their account.
Once they make the initial deposit, an NFT is minted using Stacks that serves as their membership token into the BitHealth network. This NFT will be correlated with their Bitcoin address and used as proof of membership.
Every certain number of blocks, roughly monthly, we will use Stacks and the Clarity smart contract language to check and make sure the monthly deposit has been made into that account.
If it has not, the user's NFT is revoked and they no longer have access to submit requests to the community for funding. Users always remain in control of their funds and can withdraw or stop contributing at any time.
This token-gated membership model is one of the many instances where we will take advantage of the functionality that Stacks and Clarity bring to Bitcoin.
Now let's say our new user has a health incident and needs to request funding. They submit the bill to the community for funding and people can volunteer to contribute to it from their funds.
But how do we handle privacy and eligibility checks with a decentralized system? This is another area where blockchain technology can shine. The only thing the community has access to is the user's Bitcoin address and the history associated with it.
This is how we can determine a user's generosity score and whether or not a bill should be considered a new health incident or an existing one.
So when someone submits a new bill for funding, no personally identifiable information is revealed outside of what the user wants to be revealed.
How would this work? The system would have a separate interface for healthcare providers to be able to submit the requested information and acknowledge that they are genuine by signing a transaction associated with their blockchain-based identity.
If a healthcare provider wants to join the BitHealth network, they can apply to do so and be approved collectively by a community vote. This vote would happen using Clarity smart contracts. They are now eligible to submit funding requests on behalf of patients.
One obvious drawback of this system is that members have to work with providers that are a part of the BitHealth system. To help solve this, the system should make the process of becoming accepted as a provider relatively painless and smooth so that a member that has a preferred provider could easily have them join.
So, now that the funding request has been submitted, it's time for members to contribute. When they do, their funds are sent to a Clarity smart contract using sBTC and held in escrow until the funding request has been fulfilled. Once it has, the funds are dispersed directly into the provider's Bitcoin account, again using Clarity and sBTC.
The provider can set a time limit for accepting funds, at which point they can choose to accept the total funded even if it is less than what is requested, or the funds will be automatically sent back to the funders.
You might be wondering why we can't just use things like multi-sig wallets, HTLCs, or DLCs for this functionality and keep everything directly on the Bitcoin L1 instead of needing to use an L2 like Stacks.
As we learn about Bitcoin development and explore what it would take to build something like is with Bitcoin only, we will quickly realize the shortcomings of a system like this and see where Stacks and Clarity can help.
Disclaimer: I am not a lawyer, this is far from a perfect system. There are a lot of challenges to creating decentralized versions of centralized systems that we as an industry still need to flesh out. This is only intended as a learning project and a demonstration of the potential of building on Bitcoin with layers.
With that said, let's get started building this thing. We aren't going to be building every single piece of this functionality in this series, but we'll build a simplified version so you can learn how to go forward and build things yourself.
Setting Up Our Bitcoin Dapp
Let's first look at how Bitcoin transactions are actually created and then we'll explore why this is not an ideal way to build our system.
If we look at the specs outlined above, we actually can't build out most of this functionality using Bitcoin alone without centralizing most of it.
This system could be built out using a combination of Bitcoin as payment and a centralized system to manage the rest, but the entire purpose of Bitcoin is to decentralize the money and the economy.
Critical components of our economy should be decentralized along with the money we are using to pay for them.
A rudimentary version of the funding mechanism we could create is a multisig wallet with a P2SH transaction.
This will allow us to create a wallet that the BitHealth community must collectively sign in order to withdraw funds. The workflow we might use here is that a member requests a new health event for funding, and BitHealth members can choose to fund it in an escrow multisig wallet.
Upon review and approval by the provider, the contributors can collectively release the funds to the provider to perform the service.
Creating and Sending a Bitcoin Transaction
The first thing we are going to do is list all of our UTXOs using bitcoin-cli -regtest listunspent. If you followed the original setup steps from the first section of the tutorial, this will list out a few outputs with 50 bitcoins and our generated address should have 350.
We're going to be creating a transaction to send money to someone else, so we need to generate a new address with bitcoin-cli -regtest getnewaddress which will give us a new address to work with.
In my case the new address is bcrt1q3cwy2hv9qkff8dtn3jgv0fh7rtwdvpu6dmt9pc, yours will be different.
Now we need to open up a code editor to actually build our transaction.
I'm going to create a new folder called bitcoin101 and a new file in there called transaction.json. This is where we'll build our transaction.
[
    {
        "txid": "9031a74d6a920032d46519a789f7854b996ec7d98e446c3751d24b1df68257fb",
        "vout": 0
    }
]

{
    "bcrt1q3cwy2hv9qkff8dtn3jgv0fh7rtwdvpu6dmt9pc": 49,

}
The first item here is the transaction ID that I pulled from our terminal output when we ran bitcoin-cli -regtest listunspent. Note that this is represented as the first object in an array. You might get some syntax errors here depending on your code editor, we need to do some work to get this to work with bitcoin-cli, but let's keep going for now.
Next, we have an item called vout which corresponds to which output of this transaction we are referring to. Since this particular transaction only has one output, we have an index of 0 here, indicating the first (and only in this case) output of this particular transaction.
Finally, we have another JSON object that has a key of a Bitcoin address (this is the address that we generated in the previous step) and the amount of bitcoins we are going to be transferring to this address.
Now we need to wrap each of these sections in quotes to create separate strings from each of them to pass to the CLI.
Then we need to escape the double quotes for the keys and indices of the objects.
Now we need to put it all in one row.
Mine looks like this at the end:
"[{\"txid\": \"9031a74d6a920032d46519a789f7854b996ec7d98e446c3751d24b1df68257fb\",\"vout\": 0}]" "[{\"bcrt1q3cwy2hv9qkff8dtn3jgv0fh7rtwdvpu6dmt9pc\": 49}]"
Yes, this is weird and kind of a pain. But now we have two strings representing JSON objects that we can pass to our Bitcoin script. When we work with libraries and layers in future tutorials, we won't need to deal with things like this.
We're just constructing things from scratch for now so you understand how it all works.
Next we need to run the following to create this transaction:
bitcoin-cli -regtest createrawtransaction "[{\"txid\": \"9031a74d6a920032d46519a789f7854b996ec7d98e446c3751d24b1df68257fb\",\"vout\": 0}]" "[{\"bcrt1q3cwy2hv9qkff8dtn3jgv0fh7rtwdvpu6dmt9pc\": 49}]"
And we get back a raw transaction hexadecimal string:

This contains the inputs we want to use, but it does not give us the unlocking scripts we would need to actually utilize these inputs as an output if we were the recipient.
Before we look at those, let's decode this raw transaction.
We can do that with bitcoin-cli -regtest decoderawtransaction 0200000001fb5782f61d4bd251376c448ed9c76e994b85f789a71965d43200926a4da731900000000000fdffffff0100111024010000001600148e1c455d85059293b5738c90c7a6fe1adcd6079a00000000.
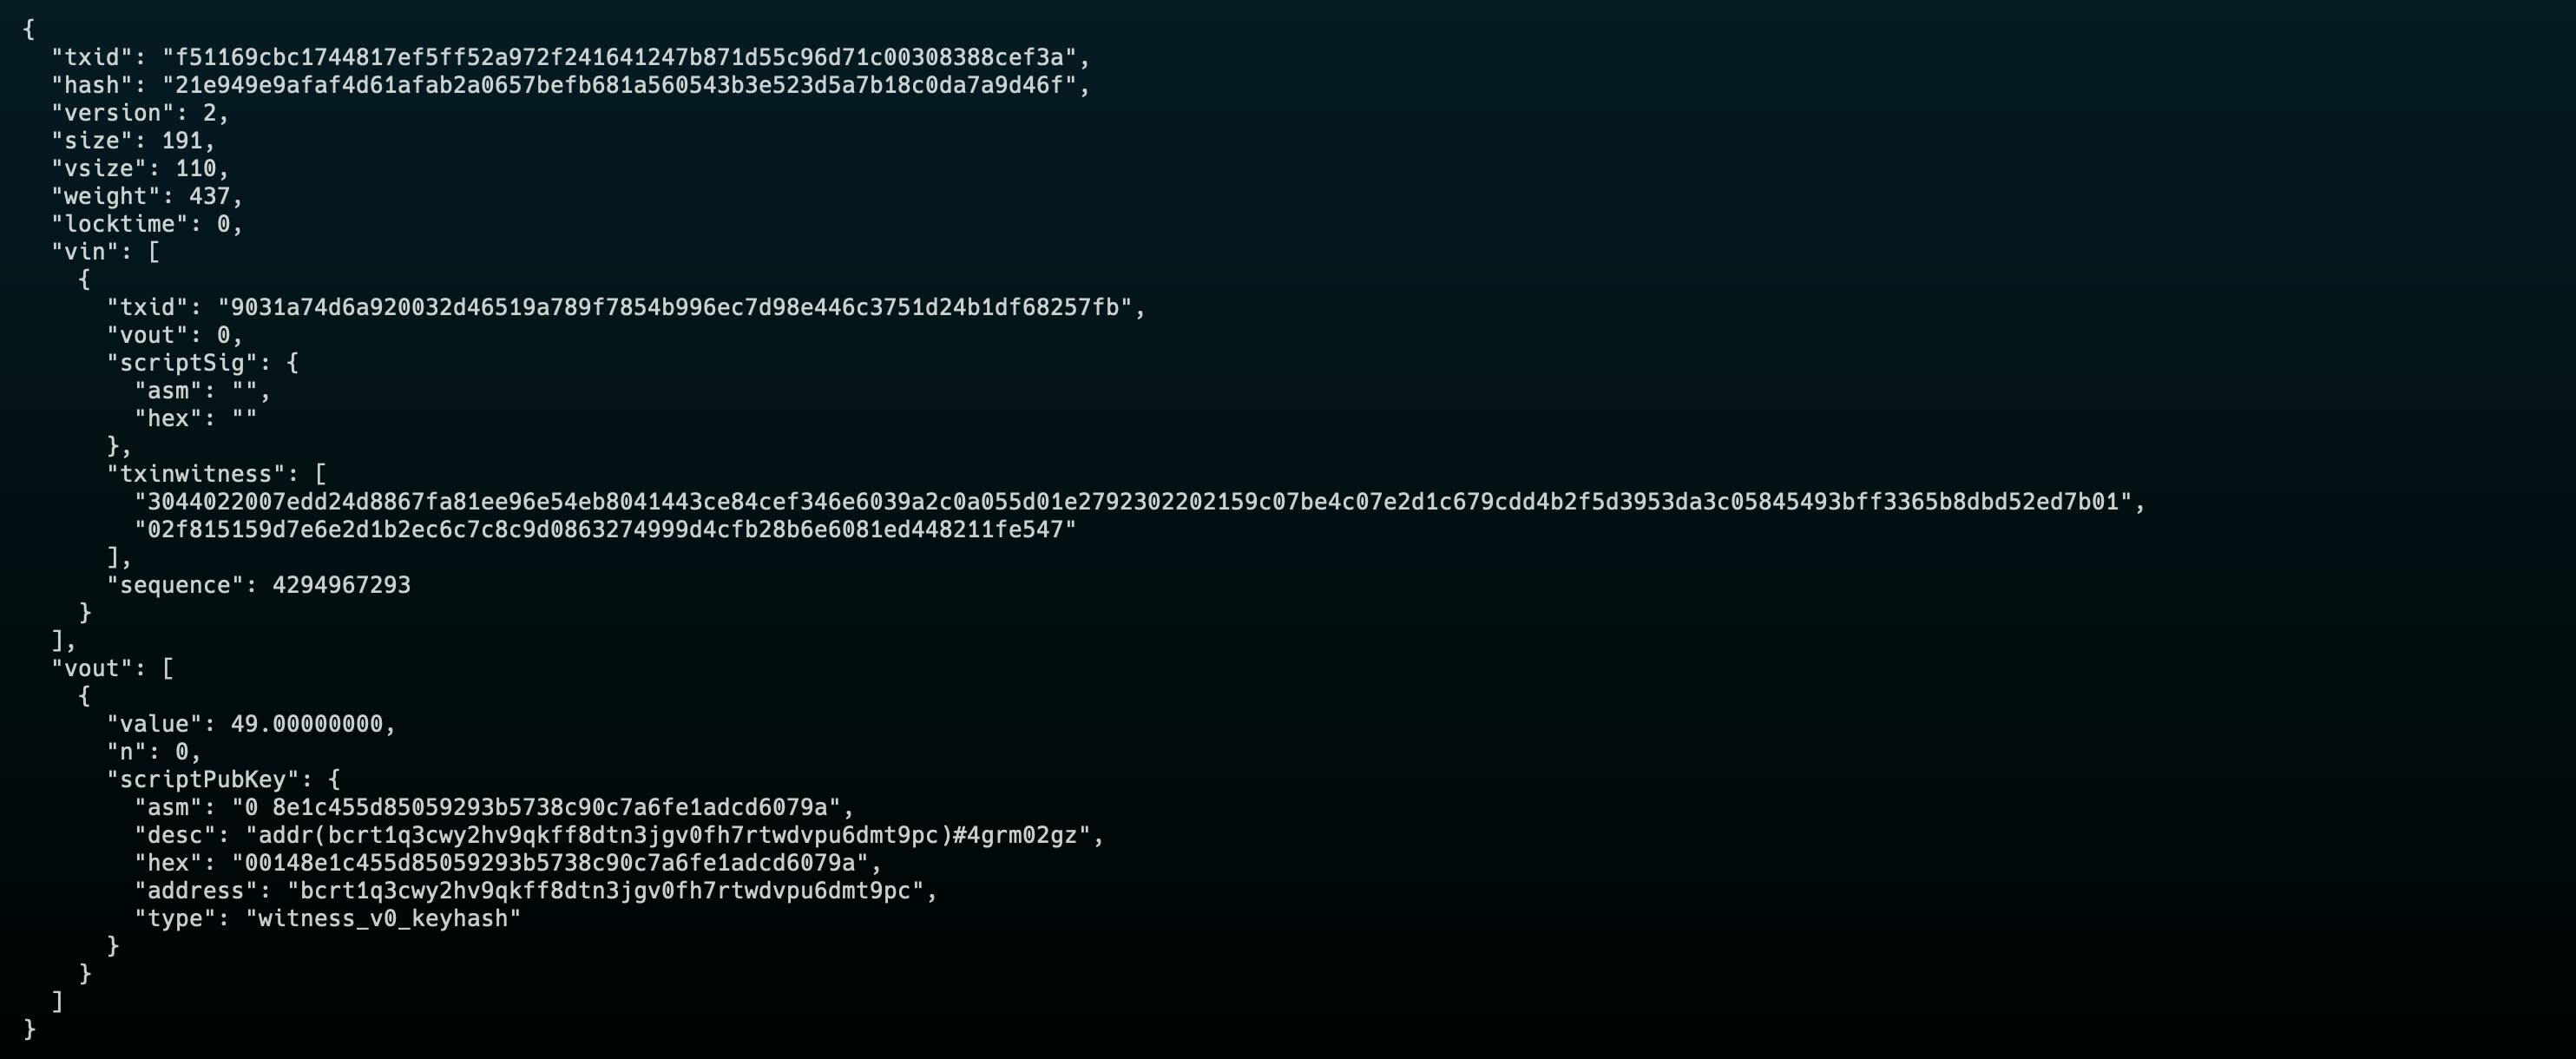
That will give us the decoded transaction:
{
  "txid": "f51169cbc1744817ef5ff52a972f241641247b871d55c96d71c00308388cef3a",
  "hash": "f51169cbc1744817ef5ff52a972f241641247b871d55c96d71c00308388cef3a",
  "version": 2,
  "size": 82,
  "vsize": 82,
  "weight": 328,
  "locktime": 0,
  "vin": [
    {
      "txid": "9031a74d6a920032d46519a789f7854b996ec7d98e446c3751d24b1df68257fb",
      "vout": 0,
      "scriptSig": {
        "asm": "",
        "hex": ""
      },
      "sequence": 4294967293
    }
  ],
  "vout": [
    {
      "value": 49.00000000,
      "n": 0,
      "scriptPubKey": {
        "asm": "0 8e1c455d85059293b5738c90c7a6fe1adcd6079a",
        "desc": "addr(bcrt1q3cwy2hv9qkff8dtn3jgv0fh7rtwdvpu6dmt9pc)#4grm02gz",
        "hex": "00148e1c455d85059293b5738c90c7a6fe1adcd6079a",
        "address": "bcrt1q3cwy2hv9qkff8dtn3jgv0fh7rtwdvpu6dmt9pc",
        "type": "witness_v0_keyhash"
      }
    }
  ]
}
Notice that we are missing the scriptSig field of the input (vin)here. We have both an input and an output in this transaction, but our unlocking script is missing, meaning we have no conditions that need to be met in order to use this UTXO. We'll need to create this in the next step so that we set some script that can meet the conditions set by the locking script in vout.
We have an input which has no script conditions to be used as an input, but if we look at the vout field we do have a scriptPubKey which corresponds to the locking script that we need to solve if we want to use this UTXO as an output for a new transaction.
Now we need to sign this transaction by providing the unlocking scripts for the outputs.
We can do this with the CLI by running bitcoin-cli -regtest signrawtransactionwithwallet 0200000001fb5782f61d4bd251376c448ed9c76e994b85f789a71965d43200926a4da731900000000000fdffffff0100111024010000001600148e1c455d85059293b5738c90c7a6fe1adcd6079a00000000 where we paste in that same raw transaction.
This will give us another raw transaction:

Let's decode that as well with bitcoin-cli -regtest decoderawtransaction 02000000000101fb5782f61d4bd251376c448ed9c76e994b85f789a71965d43200926a4da731900000000000fdffffff0100111024010000001600148e1c455d85059293b5738c90c7a6fe1adcd6079a02473044022007edd24d8867fa81ee96e54eb8041443ce84cef346e6039a2c0a055d01e2792302202159c07be4c07e2d1c679cdd4b2f5d3953da3c05845493bff3365b8dbd52ed7b012102f815159d7e6e2d1b2ec6c7c8c9d0863274999d4cfb28b6e6081ed448211fe54700000000.
We have something important to learn here. Pay attention to the txinwitness field here. Notice that the scriptSig field is still empty, but now we have something in this new txinwitness field.
This is a new script we haven't seen yet, and it has to do with the SegWit update. This new script is a P2WPKH, or pay to witness public key hash. It's very similar to a P2PKH script, except it occurs when a native SegWit wallet wallet sends a UTXO to another SegWit wallet.
The scriptPubKey, which is our locking script, also doesn't actually look like a script. It's just a 0 with what looks like an address behind it.
What's going on here?
This P2WPKH transaction actually has all the same information as a P2PKH transaction, but the data is in funky places.
The entire point of SegWit is to "segregate the witness" data (segregated witness) in order to save space taken up by transaction data. The public keys and signatures are what the witness data is composed of, so those get pulled out of the transaction itself in order to decrease the amount of space the transaction takes up.
So where does the data go?
That's where the txinwitness field comes in.
These two values are a signature and a public key. The 0 plus long string in the scriptPubKey field is the SegWite version plus the public key hash.
You can read more about how this works on a non-SegWit node here, although this is quite rare these days.
A SegWit node just knows to hash the public key in the txinwitness field, check that against the already-hashed key in the scriptPubKey field, and then finally run OP_CHECKSIG against the public key and signature provided in the txinwitness data.
Basically, the P2PKH script has been embedded in the core protocol as the default way to process transactions.
Now we need to actually send this transaction.
Remember that due to the way UTXOs work we need to not only send this transaction but we also need to create another transaction to send our change back to ourselves.
Let's first generate a change transaction with bitcoin-cli -regtest getrawchangeaddress which gives us a new address.

Now we're going to take that and append it to our previous transaction with the amount of change we want to send back.
bitcoin-cli -regtest createrawtransaction "[{\"txid\": \"9031a74d6a920032d46519a789f7854b996ec7d98e446c3751d24b1df68257fb\",\"vout\": 0}]" "{\"bcrt1q3cwy2hv9qkff8dtn3jgv0fh7rtwdvpu6dmt9pc\": 49, \"bcrt1q6ktd4t8vwtqww6882v5xk7d3k9a65xqelamqk2\": 0.99}"
What we are saying here is that we want to take our UTXO of 50 bitcoins, send 49 to one address, send 0.99 back to ourselves as change, and use the remainder as a transaction fee.
If we run this we get a new raw transaction.

Now we need to sign this with bitcoin-cli -regtest signrawtransactionwithwallet 0200000001fb5782f61d4bd251376c448ed9c76e994b85f789a71965d43200926a4da731900000000000fdffffff0200111024010000001600148e1c455d85059293b5738c90c7a6fe1adcd6079ac09ee60500000000160014d596daacec72c0e768e753286b79b1b17baa181900000000.

And then we copy the hex code and broadcast the transaction with bitcoin-cli -regtest sendrawtransaction 02000000000101fb5782f61d4bd251376c448ed9c76e994b85f789a71965d43200926a4da731900000000000fdffffff0200111024010000001600148e1c455d85059293b5738c90c7a6fe1adcd6079ac09ee60500000000160014d596daacec72c0e768e753286b79b1b17baa18190247304402201d1e720b1847bd4e020c1f82012917f99a16bddd4e4d053efad03192b510e67a02202ceb0f604c81630628aee1c44152647c836aa66f5e95e83756080810391bc7be012102f815159d7e6e2d1b2ec6c7c8c9d0863274999d4cfb28b6e6081ed448211fe54700000000.

That gives us a transaction hash. Now we can generate a new block with bitcoin-cli -regtest -generate 1 and this transaction will be included.
Then we can list our UTXOs with bitcoin-cli -regtest listunspent and see the new UTXOs listed at the top.
That was a lot. Most of this functionality is handled by whatever wallet software you use. But now you know how transactions are created and sent. If we wanted to build BitHealth with Bitcoin only, we would need to build the functionality to generate these addresses and scripts using a library like BitcoinJS.
But then the user would need to use a separate wallet app to interact with all of this, and much of the functionality would need to be handled by a traditional centralized web app. If we wanted to do anything other than send basic payments (which we do for something like BitHealth) all of that would need to facilitated by a trusted third party.
Next Steps
So far we've been very focused on the internals of creating and sending Bitcoin transactions. If this was all a bit much, don't worry, this is not what your day-to-day building process will look like using the tools we'll be covering next.
it's important to understand some of the internals of how Bitcoin transactions work and are sent, but we'll be getting set up with some developer tools that will make all this a lot easier.
In the next tutorial in the series, we'll begin working on how to interact with our dapp using a web wallet for Bitcoin, in the same way we might interact with an Ethereum app using something like MetaMask.
One of the most challenging things about building in the Bitcoin ecosystem is that the tooling is extremely sparse and difficult to use for developers who are used to building for the web or web3.
This is another area where Stacks shines, as they provide great tools for developers to more easily build Bitcoin dapps.
In the rest of the series, we'll be introducing and using a Bitcoin web wallet and JS library from Hiro that will make it much easier to build Bitcoin dapps.
Specifically, in the next tutorial, we'll be setting up our BitHealth app project and integrating the Hiro web wallet to allow users to use and authenticate with a Bitcoin wallet.