
Getting Set Up with Stacks for Bitcoin App Development
How to Set Up a Bitcoin App with Hiro Web Wallet Authentication

I'm a developer of 9+ years obsessed with how to use technology to build a better world. Currently focused on teaching other developers how to build tools that will revolutionize the economy and world of work using Bitcoin and AI.
Up until now, we've lived mainly inside of Bitcoin itself, learning about the internals of how it works.
During that, we've also been exposed to some of the main drawbacks of attempting to build fully decentralized applications on Bitcoin.
First, it is difficult. The existing tooling for Bitcoin is not great for building apps like you would with Ethereum. It's confusing, clunky, and difficult to build robust apps, especially for someone used to making things on the web.
If you paid attention to the last tutorial, you might be wondering how we would actually go about creating our BitHealth app with a web interface.
For example, we talked about a hypothetical multisig setup where a member requests funding, and then a multisig is created to handle that.
What we would have to do here is create a web app where we would use a library like BitcoinJS to programmatically create a new P2SH wallet based on people that volunteered to contribute to that member's fund. Then members must use their own separate wallet app to pay to that address.
We could use something like the Hiro web wallet to make it easier for folks to utilize a web wallet with their Bitcoin. Using this we could programmatically generate a new address for each funding request.
Then when we created a funding request, funders could use their Hiro Bitcoin wallet to say that they are willing to fund a certain amount.
Then we would need to initiate a new PSBT on behalf of the request that all funders would have to sign in order for the funds to be sent to the specified wallet for the request.
Just this one piece of functionality alone requires a clunky, disjointed process that is difficult to use for both the user and the developer.
We could simplify it and make it so that all a funder does is send BTC directly to someone requesting the funding, but then all we are doing is facilitating payment, which introduces all kinds of elements of needing to trust third parties in order to have a fully-functioning app.
This brings us to the second major drawback of building on Bitcoin: everything except for the transfer of money itself has to be centralized.
The records of members and their status, a member proposing funding for a new health event, the history of that member, the records of verified providers, the approval of those providers by the community, the conditional agreement to fund that health event by other members, calculating and maintaining the generosity score, the claiming by the provider, the verification of the legitimacy of the claim, and the conditions under which the provider is paid from the hypothetical multisig we talked about are all centralized and need to be delegated to a trusted third party.
The payment itself, and its approval of disbursement by the community, are handled by the Bitcoin script and maybe something like a PSBT. Still, everything else is handled by a single centralized entity. Maybe this is fine, but if we want to build a decentralized economy on top of Bitcoin, we should be thinking about how we can build systems that are trust-minimized from end to end.
How can we decentralize the rest of the process and make both the user experience and developer experience better?
That's where Stacks comes in. Now we get to actually start building the fun stuff.
In this tutorial, we're going to be introduced to Stacks and the Hiro developer tools and get our BitHealth app set up, using a Bitcoin wallet to authenticate.
Coming up after this, we'll take a look at sBTC and Clarity and see how they enable us to build robust apps and smart contracts with Bitcoin.
If you aren't familiar with Stacks, how it works, or the problem it solves, the documentation is an excellent place to start.
Familiarize yourself a bit with Stacks, then come back here and we'll get started building.
Setting up Our Project
The first thing we need to do is get our project up and running. We're going to be using Next and Tailwind to build out our front end and a tool called Clarinet to manage the Stacks side of things.
For this project, I am running Node v18.7 with NPM 8.15. You'll need to have those installed to follow along.
For now, let's create our project with mkdir bithealth && cd bithealth .
From inside there, we will initialize our frontend with next and Tailwind by running npx create-next-app@latest frontend --typescript --eslint.
Right now I'm just following the instructions on Tailwind's website.
Next, we switch into that new directory and get everything installed with npm install -D tailwindcss postcss autoprefixer and initialize our Tailwind file with npx tailwindcss init -p.
Now it's time to open up our code editor and edit this tailwind.config.js file that was just created.
/** @type {import('tailwindcss').Config} */
module.exports = {
  content: [
    "./app/**/*.{js,ts,jsx,tsx}",
    "./pages/**/*.{js,ts,jsx,tsx}",
    "./components/**/*.{js,ts,jsx,tsx}",

    // Or if using `src` directory:
    "./src/**/*.{js,ts,jsx,tsx}",
  ],
  theme: {
    extend: {},
  },
  plugins: [],
};
And we need to edit our src/styles/globals.css file.
@tailwind base;
@tailwind components;
@tailwind utilities;
Next let's modify the src/pages/index.tsx file.
import Head from "next/head";
import Image from "next/image";
import { Inter } from "next/font/google";
import styles from "@/styles/Home.module.css";

const inter = Inter({ subsets: ["latin"] });

export default function Home() {
  return (
    <>
      <Head>
        <title>Create Next App</title>
        <meta name="description" content="Generated by create next app" />
        <meta name="viewport" content="width=device-width, initial-scale=1" />
        <link rel="icon" href="/favicon.ico" />
      </Head>
      <div className="flex items-center justify-center h-screen">
        <h1 className="text-6xl font-bold text-gray-900">Hello World</h1>
      </div>
    </>
  );
}
Now we can see if it worked by running npm run dev.

And with that setup out of the way, we can begin building our dapp.
Before we do that, we have one more step.
We need to get setup with the Hiro wallet.
If you don't have it yet, go ahead and install it from Hiro's website.
Creating Local Stacks and Bitcoin Networks
Before we get started building our dapp, we need to set ourselves up with a local development network.
Remember from the previous tutorial that we used Bitcoin's regtest option to run a local Bitcoin network?
We need to do something similar here with both Bitcoin and Stacks. We can use another excellent Hiro tool called Clarinet to do that.
Follow the instructions to get Clarinet installed in the GitHub repo, then come back here and we'll get it running.
Once you have it installed, switch back into the main bithealth repo and run clarinet new backend.
This is where we'll be putting our Clarity smart contracts once we get those going. For now, we are just needing to get a local test network going.
But there's a catch here that we need to work around for now. The Hiro wallet doesn't support regtest yet, which means that we can't use the Hiro wallet in order to interact with our local Bitcoin environment.
We'll still use Clarinet for development purposes, but we'll need to interact with Bitcoin and Stacks testnet's for development for now.
Getting Testnet BTC and STX
We need to get our Bitcoin address set up with some testnet bitcoins.
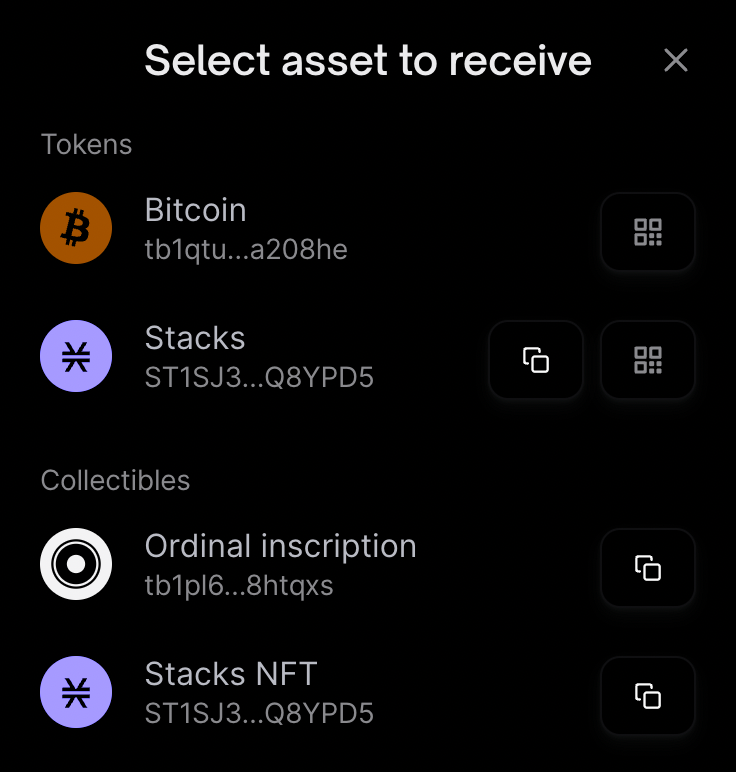
Grab the testnet Bitcoin address from your Hiro wallet and head to [this testnet faucet](https://bitcoinfaucet.uo1.net/) to get some testnet BTC sent to it.
You can find your testnet address by clicking on 'Receive', and then the little QR code icon, which will bring up a menu option to copy your BTC address.
Next, get some testnet STX from this faucet.
Let's add some authentication while we wait for those to confirm.
Setting Up Authentication
Now we need to add the ability for users to authenticate into our app with their Hiro wallet.
Then we can use that wallet authentication in order to view their Bitcoin address using Stacks.js.
Stacks and Bitcoin addresses share a derivation path and are both generated deterministically from the same private key, meaning that every Stacks address automatically has a corresponding Bitcoin address.
First, let's intall the @stacks/connect package. This is what we'll use to set up our app with Hiro wallet authentication.
npm install @stacks/connect
After that installs we want to swap out the content of our src/pages/index.tsx file with this.
import Head from "next/head";

function Home() {
  const connectWallet = () => {
    // implement code
  };

  return (
    <div className="flex flex-col items-center justify-center h-screen gap-8">
      <button
        className="p-4 text-white bg-indigo-500 rounded"
        onClick={connectWallet}
      >
        Connect Wallet
      </button>
      <h1 className="text-6xl font-black">BitHealth</h1>
    </div>
  );
}

export default Home;
This is just a simple UI with a button placeholder that will allow us to connect our wallet with our app.

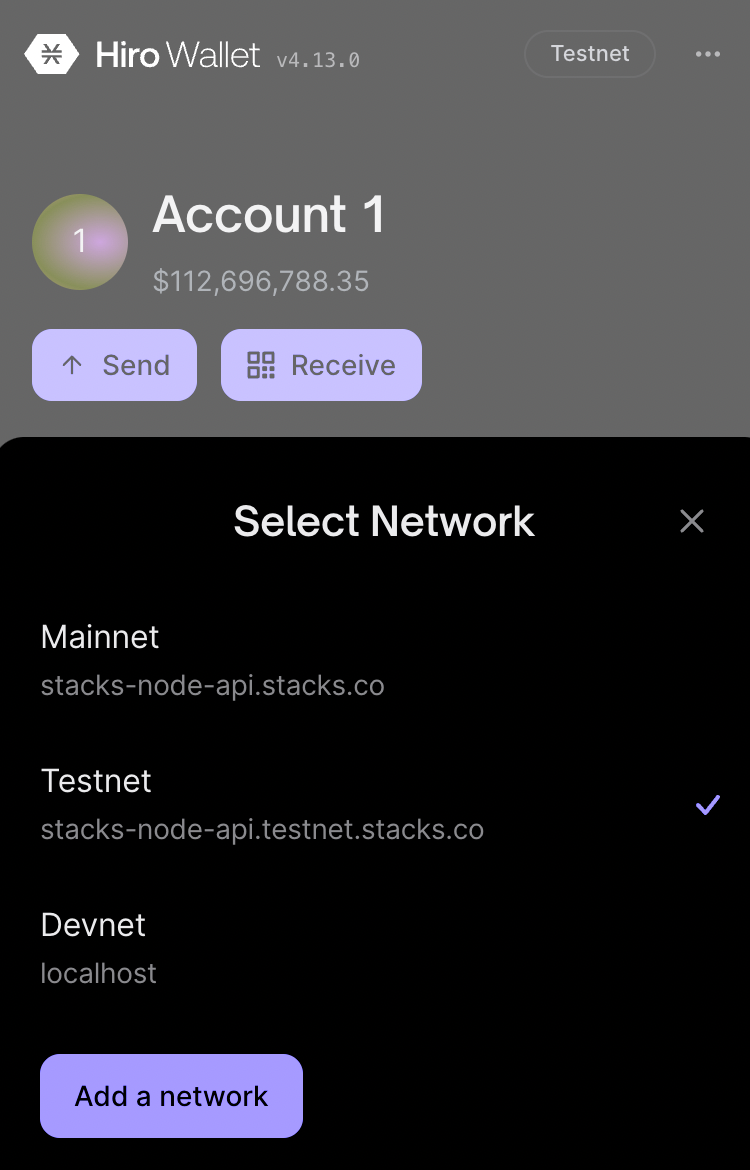
Now let's implement this button functionality. You should have the Hiro wallet installed, and before we get the wallet button connected, go ahead and switch to Testnet from within the Hiro wallet.
Then hit the menu button in Hiro (three dots in the top right), followed by "Change Network", then select "Testnet".
Next we need to import a few things from the @stacks/connect package.
import {
  AppConfig,
  UserSession,
  showConnect,
} from "@stacks/connect";
The first things we need to do are get some setup done using AppConfig and UserSession which will provide some information for the wallet to read from and to store the user session itself using this config. We also need to provide some information for the wallet to display to users.
We can add these lines right above our stub connectWallet function.
  const appConfig = new AppConfig(["store_write"]);
  const userSession = new UserSession({ appConfig });

  const appDetails = {
    name: "BitHealth",
    icon: "https://freesvg.org/img/Public-health-icon.png",
  };
This app config tells the wallet that we need permission to store and write data to the Stacks chain.
Next up we need to implement the connectWallet function itself.
Here we just need to use the showConnect import and the information we just created.
const connectWallet = () => {
    showConnect({
      appDetails,
      onFinish: () => window.location.reload(),
      userSession,
    });
  };
the onFinish callback tells the wallet that when the wallet finishes connecting we need to reload the page.
We can't actually see that doing anything yet, so let's add some more code in order to store and display this user data we now have access to.
First we need to create a new state variable, so we'll need to import useState and create a new state variable to store our user data.
After that we need to add another chunk of code to conditionally show our use data if we have a logged in user. For now though, we'll just set up a useEffect call to pull the data on page load and log that info to the console.
Here's what our file looks like with those changes.
import Head from "next/head";
import { useState, useEffect } from "react";

import {
  AppConfig,
  UserSession,
  showConnect,
} from "@stacks/connect";

function Home() {
  const [userData, setUserData] = useState({});

  const appConfig = new AppConfig(["store_write"]);
  const userSession = new UserSession({ appConfig });

  const appDetails = {
    name: "BitHealth",
    icon: "https://freesvg.org/img/Public-health-icon.png",
  };

  useEffect(() => {
    if (userSession.isSignInPending()) {
      userSession.handlePendingSignIn().then((userData) => {
        setUserData(userData);
      });
    } else if (userSession.isUserSignedIn()) {
      setUserData(userSession.loadUserData());
    }
  }, []);

  console.log(userData);

  const connectWallet = () => {
    showConnect({
      appDetails,
      onFinish: () => window.location.reload(),
      userSession,
    });
  };

  return (
    <div className="flex flex-col items-center justify-center h-screen gap-8">
      <button
        className="p-4 text-white bg-indigo-500 rounded"
        onClick={connectWallet}
      >
        Connect Wallet
      </button>
      <h1 className="text-6xl font-black">BitHealth</h1>
    </div>
  );
}

export default Home;
And if we reload the page or re-connect our wallet we can see that data.

Now let's modify this code a bit to conditionally display our Bitcoin address if we are logged in.
<div className="flex flex-col items-center justify-center h-screen gap-8">
      <h1 className="text-6xl font-black">BitHealth</h1>
      {!userData ? (
        <button
          className="p-4 text-white bg-indigo-500 rounded"
          onClick={connectWallet}
        >
          Connect Wallet
        </button>
      ) : (
        <p>{userData.profile.btcAddress.p2wpkh.testnet}</p>
      )}
    </div>
Now we should see our Bitcoin address displaying.

How can we get the balance of this address we are using? We can see it in our Hiro wallet, but what if we want to display it in our app?
There is no simple way to get the balance of a Bitcoin address, as you have to calculate the balance of all the UTXOs on the chain, but we can use third-party services to make the process easier.
We can use a service like BlockCypher's API to query the Bitcoin testnet to get the balance of our address.
There is a simple endpoint we can use for this by entering in the address given to us by the Hiro wallet.
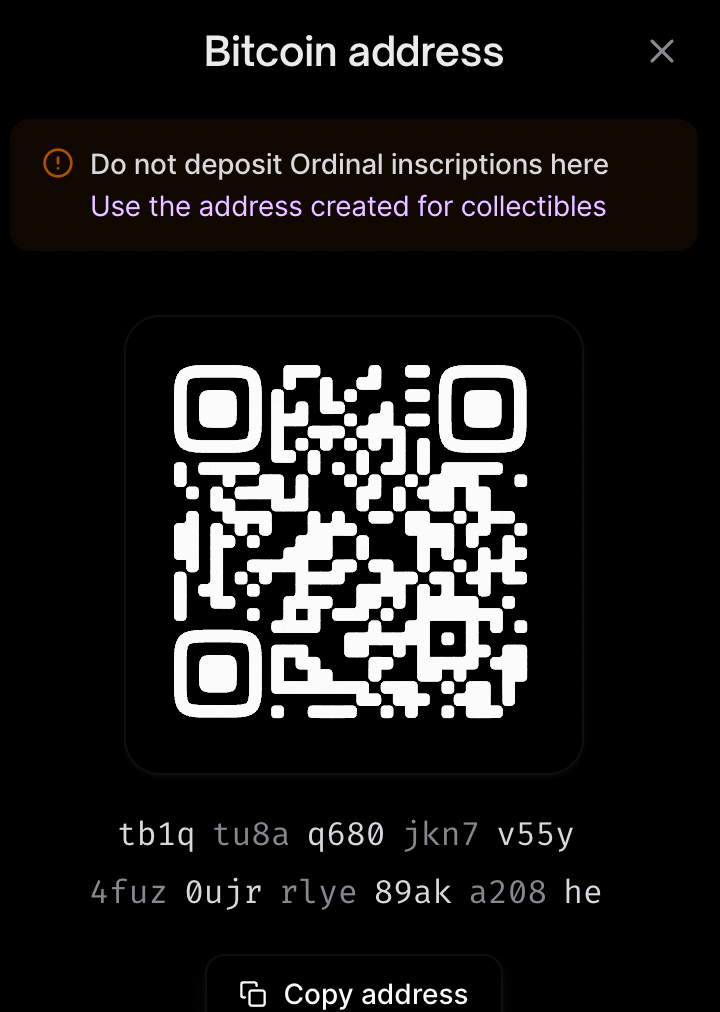
https://api.blockcypher.com/v1/btc/test3/addrs/tb1qtu8aq680jkn7v55y4fuz0ujrrlye89aka208he
If we go there we can see our balance denoted in Satoshis.
{
  "address": "tb1qtu8aq680jkn7v55y4fuz0ujrrlye89aka208he",
  "total_received": 6000,
  "total_sent": 0,
  "balance": 6000,
  "unconfirmed_balance": 0,
  "final_balance": 6000,
  "n_tx": 1,
  "unconfirmed_n_tx": 0,
  "final_n_tx": 1,
  "txrefs": [
    {
      "tx_hash": "a85e167483c73c08a4f4e6505fb113caa8947e9bdf1859982e57182e0310a290",
      "block_height": 2425428,
      "tx_input_n": -1,
      "tx_output_n": 0,
      "value": 6000,
      "ref_balance": 6000,
      "spent": false,
      "confirmations": 2,
      "confirmed": "2023-03-22T16:34:44Z",
      "double_spend": false
    }
  ],
  "tx_url": "https://api.blockcypher.com/v1/btc/test3/txs/"
}
Let's add some more code to retrieve and display this data.
First we'll add a new state variable.
const [walletBalance, setWalletBalance] = useState(0);
Next let's set up another useEffect to pull this data.
useEffect(() => {
    if (userData.profile) {
fetch(`https://api.blockcypher.com/v1/btc/test3/addrs/${userData.profile.btcAddress.p2wpkh.testnet}`
      )
        .then((res) => res.json())
        .then((data) => {
          setWalletBalance(data.balance);
        });
    }
  }, [userData]);
Here we are setting up another React effect hook that runs whenever our userData state object changes. Then we are just making sure the data we want is present before we call the API endpoint with our testnet address and updating the walletBalance state variable.
Finally, let's update the UI to show this.
return (
    <div className="flex flex-col items-center justify-center h-screen gap-8">
      <h1 className="text-6xl font-black">BitHealth</h1>
      {!userData.profile ? (
        <button
          className="p-4 text-white bg-indigo-500 rounded"
          onClick={connectWallet}
        >
          Connect Wallet
        </button>
      ) : (
        <>
          <p>{userData.profile.btcAddress.p2wpkh.testnet}</p>
          <p>{walletBalance} Satoshis</p>
        </>
      )}
    </div>
  );
After all this, here's what your index.tsx file should look like.
import Head from "next/head";
import { useState, useEffect } from "react";

import { AppConfig, UserSession, showConnect } from "@stacks/connect";

function Home() {
  const [userData, setUserData] = useState({});
  const [walletBalance, setWalletBalance] = useState(0);

  const appConfig = new AppConfig(["store_write"]);
  const userSession = new UserSession({ appConfig });

  const appDetails = {
    name: "BitHealth",
    icon: "https://freesvg.org/img/Public-health-icon.png",
  };

  useEffect(() => {
    if (userSession.isSignInPending()) {
      userSession.handlePendingSignIn().then((userData) => {
        setUserData(userData);
      });
    } else if (userSession.isUserSignedIn()) {
      setUserData(userSession.loadUserData());
    }
  }, []);

  useEffect(() => {
    if (userData.profile) {
      fetch(
        `https://api.blockcypher.com/v1/btc/test3/addrs/${userData.profile.btcAddress.p2wpkh.testnet}`
      )
        .then((res) => res.json())
        .then((data) => {
          setWalletBalance(data.balance);
        });
    }
  }, [userData]);

  const connectWallet = () => {
    showConnect({
      appDetails,
      onFinish: () => window.location.reload(),
      userSession,
    });
  };

  return (
    <div className="flex flex-col items-center justify-center h-screen gap-8">
      <h1 className="text-6xl font-black">BitHealth</h1>
      {!userData.profile ? (
        <button
          className="p-4 text-white bg-indigo-500 rounded"
          onClick={connectWallet}
        >
          Connect Wallet
        </button>
      ) : (
        <>
          <p>{userData.profile.btcAddress.p2wpkh.testnet}</p>
          <p>{walletBalance} Satoshis</p>
        </>
      )}
    </div>
  );
}

export default Home;
And you should see your balance is displayed in the UI.

Awesome! We have a good start here. The next step is to create our join functionality. That's the main feature we'll be building over the rest of the series and it will give us the opportunity to learn how Stacks interacts with and uses Bitcoin, give us a chance to learn about and experiment with an alpha version of sBTC, the upcoming decentralized 1:1 BTC asset on Stacks.
sBTC is the core of what allows us to build Bitcoin-first dapps in a decentralized way. We'll get into the nitty gritty of it in the next tutorial.
sBTC is still under development and will be released later this year, but until then we can play around with an alpha version to learn how it works and prepare for testnet and mainnet release.